Hello everyone, in this article I will be giving you information about Context Api, a state management tool in React. Before moving on to Context Api, I want to give a little information about state, props and state management tools.
What is State?
We call state the data that specifies, qualifies and can be manipulated the state of a component. Let’s create an example state.
Creating State in Function Components
To create state in function components, it is generally created using the useState Hook in React.
import React, { useState } from 'react';

function Example() {
  // Declare a new state variable, which we'll call "count"
  const [count, setCount] = useState(0);

  return (
    <div>
      <p>You clicked {count} times</p>
      <button onClick={() => setCount(count + 1)}>
        Click me
      </button>
    </div>
  );
}
Creating State in Class Components
Let’s see how to create a state with a class structure.
class Example extends React.Component {
  constructor(props) {
    super(props);
    this.state = {
      count: 0
    };
  }

  render() {
    return (
      <div>
        <p>You clicked {this.state.count} times</p>
        <button onClick={() => this.setState({ count: this.state.count + 1 })}>
          Click me
        </button>
      </div>
    );
  }
}
Above we have learned what state is and how it is used in function and class components. Now let’s look at what props is.
What is Props?
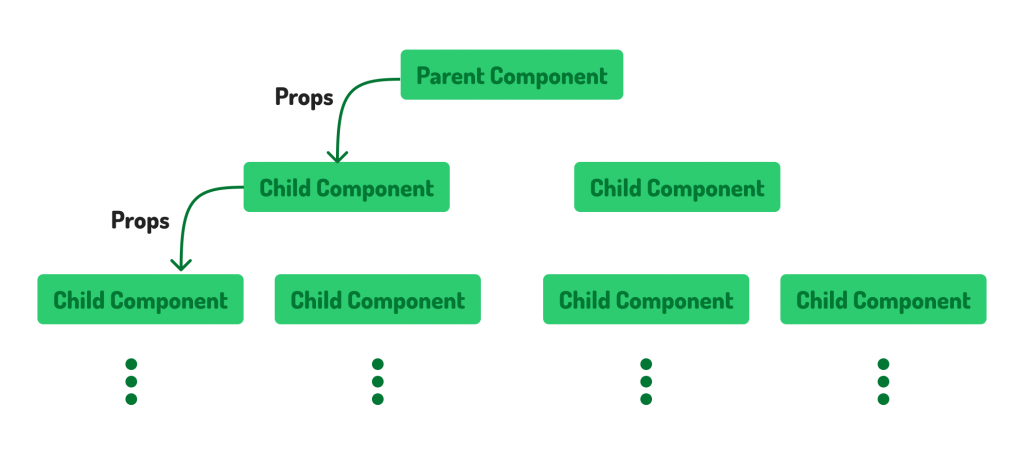
It is a method of transferring a state created in the parent component to a child component. This transfer phase is also called Prop Drilling. Let’s look at using props with a simple props example.

function Welcome(props) {
  return <h1>Hello, {props.name}</h1>;
}

function App() {
  return (
    <div>
      <Welcome name="Sara" />
      <Welcome name="Cahal" />
      <Welcome name="Edite" />
    </div>
  );
}
Welcome is our child component. When we add the welcome child component to the app, we create a props with the name attribute. So we can send data to the child component with the help of props. Yes, we have learned what props is. Now let’s take a look at the most used state management tools.
Widely used State Management Tools
- Context Api (A state management tool ideal for small projects)
- Redux (Redux Toolkit) (A state management tool used in large projects)
- Recoil
- Jotai
- Rematch
- Zustand
- Hookstate
Yes, we have learned state, props and some of the most used state management tools above. Now let’s look at the context api state management tool, which is our main topic.
What is Context Api?
When we first created a react project, we could move our states to a sub-component with the help of props. But when the project grew or there were 10-20 components nested inside, our work was getting very difficult. After a while, we were unable to do state management. Here, context api, one of the state management tools, comes into play. Context Api helps us to manage the states we have created. But how does it do this?
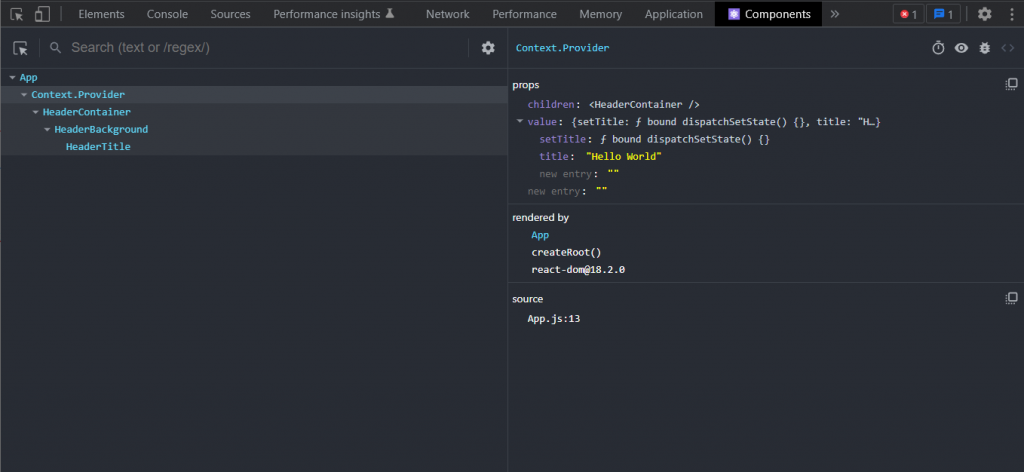
Context API takes the created components into a container provider. In this way, a state created in a parent component can be transferred to the lowest component without being transferred to a child component with props.
Without Context api, we had to transfer our statet to the child component as in the following coding.
import React, { useState } from "react";
import "./App.css";

const App = () => {
	const [title, setTitle] = useState("Hello World");
	return <HeaderContainer title={title} />;
};

const HeaderContainer = (props) => {
	const { title } = props;
	return (
		<HeaderBackground>
			<HeaderTitle title={title} />
		</HeaderBackground>
	);
};

const HeaderBackground = (props) => {
	return <div className="header-image">{props.children}</div>;
};

const HeaderTitle = (props) => {
	const { title } = props;
	return <p>{title}</p>;
};

export default App;
Now let’s prepare this structure step by step with context api.
1-) Let’s create a file named context.jsx in the src file of the project. Let’s add the following codes into this file. Then we will be importing this file in every component where we will use the contenxt structure.
import { createContext, useContext } from "react";

const context = createContext();

export { context, useContext };
2-) Now let’s edit the state management done with the props above and do the state management with context api.
import React, { useState } from "react";
import "./App.css";
import { MainContext, useContext } from "./context/context";

const App = () => {
	const [title, setTitle] = useState("Hello World");
	return (
		<MainContext.Provider value={{ title, setTitle }}>
			<HeaderContainer />
		</MainContext.Provider>
	);
};

const HeaderContainer = () => {
	return (
		<HeaderBackground>
			<HeaderTitle />
		</HeaderBackground>
	);
};

const HeaderBackground = (props) => {
	return <div className="header-image">{props.children}</div>;
};

const HeaderTitle = () => {
	const { title } = useContext(MainContext);
	return <p>{title}</p>;
};

export default App;

Yes, I transferred our title statet from App component to HeaderTitle component using Context api. When the coding was not a nested props structure, our codes became more readable and our work became easier. We can do a little more editing on the value value used with MainContext.Provider in App. We can keep the values in a StateValue value. We can transfer that value to the value value. I think the coding done in this way will be cleaner ?
const App = () => {
	const [title, setTitle] = useState("Hello World");

	const StateValue = {
		title,
		setTitle,
	};
	return (
		<MainContext.Provider value={StateValue}>
			<HeaderContainer />
		</MainContext.Provider>
	);
};
In this article, I have given you information about state, props and Context Api which is a state management tool. See you in my next blog post. Take care of yourselves. ?


